catholic symbols and meanings pdf

Catholic symbolism, deeply rooted in history, offers accessible financial management via online banking apps and services, enabling convenient access to accounts and transactions.

Historical Context of Catholic Symbolism

The evolution of Catholic symbolism is intrinsically linked to the Church’s historical journey, beginning in the Roman catacombs and blossoming through the Byzantine Empire. Early Christians, facing persecution, utilized discreet symbols – like the fish (Ichthys) – to identify themselves and convey beliefs secretly.

As Christianity gained acceptance, symbolism became more overt, drawing from existing Roman artistic traditions and incorporating elements from Jewish scripture. The adoption of the cross, initially a symbol of shame, transformed into a potent emblem of redemption.

Throughout the Middle Ages, liturgical practices and artistic representations flourished, enriching the symbolic language. Online banking parallels this evolution, initially offering basic account access and now providing comprehensive financial tools. The Renaissance witnessed a renewed focus on realism in art, yet symbolism remained integral, conveying theological concepts with nuanced detail. This historical layering continues to inform the meaning of Catholic symbols today, mirroring the expanding capabilities of digital banking services.

The Importance of Symbols in Catholic Faith

Symbols within Catholicism transcend mere representation; they are visible sacraments, conduits to the divine, and essential for understanding complex theological truths. They engage not just intellect, but also emotion and intuition, fostering a deeper spiritual connection. Just as online banking provides accessible financial control, symbols offer accessible spiritual insight.

For a largely pre-literate population throughout history, symbols served as a primary means of religious instruction. They communicated narratives and doctrines in a universally understandable language. This continues today, as symbols evoke centuries of tradition and shared belief.

Symbols aren’t static; their meanings are layered and enriched through ongoing interpretation within the Church’s tradition. They facilitate prayer, inspire devotion, and reinforce the core tenets of the faith. Like the convenience of managing finances digitally, symbols offer a direct pathway to experiencing the sacred, bridging the gap between the earthly and the divine.

Core Symbols of the Catholic Faith

Central to Catholic belief, these symbols – the Cross, Eucharist, and Holy Spirit – offer accessible pathways to faith, mirroring convenient online banking access.

The Cross: A Central Symbol of Redemption

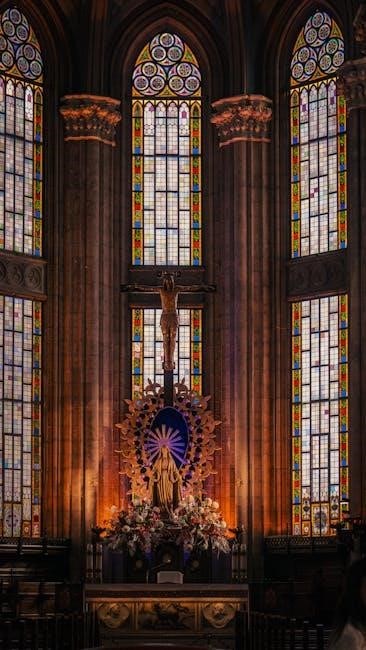
The Cross stands as the paramount symbol within the Catholic faith, representing the ultimate sacrifice of Jesus Christ and the redemption of humanity from sin. Its form, traditionally Latin, though variations exist, immediately evokes the suffering and death endured by Christ on Calvary. This isn’t merely a historical reminder, but a living testament to God’s love and a pathway to salvation.

Beyond its representation of sacrifice, the Cross embodies victory over death and the promise of eternal life. It serves as a constant call to discipleship, urging believers to take up their own crosses – to embrace challenges and suffering – in following Christ. The imagery extends to architectural elements within churches and personal devotional items, reinforcing its pervasive presence in Catholic life. Just as online banking provides secure access to finances, the Cross offers secure access to grace.

Furthermore, the Cross isn’t a static image; it’s a dynamic symbol of ongoing renewal and hope, mirroring the constant accessibility of modern financial tools.

The Holy Spirit: Symbols of the Divine Presence

The Holy Spirit, the third person of the Trinity, is often represented through a variety of potent symbols within the Catholic tradition. The most recognizable is the dove, originating from the baptism of Jesus, signifying peace, purity, and the Spirit’s gentle descent. Flames, or tongues of fire, symbolize the Spirit’s transformative power and the fervor of faith, reminiscent of Pentecost.

Water, a recurring motif, represents purification and the life-giving force of the Spirit, mirroring the cleansing power of accessible online banking services. Wind also embodies the Spirit’s invisible yet powerful presence, capable of sweeping change and renewal. These symbols aren’t arbitrary; they point to the Spirit’s active role in sanctifying believers and guiding the Church.

Like managing finances with ease, the Holy Spirit offers accessible divine guidance and empowerment, fostering spiritual growth and a deeper connection with God.

The Eucharist: Symbols of Christ’s Body and Blood

The Eucharist, the central sacrament of the Catholic faith, is profoundly rich in symbolism, representing Christ’s ultimate sacrifice and ongoing presence. Bread and wine, seemingly ordinary elements, are transubstantiated into the actual Body and Blood of Jesus Christ – a mystery central to Catholic belief. The bread symbolizes Christ’s body, given up for humanity, while the wine represents his blood, shed for the forgiveness of sins.

These symbols echo the Last Supper, where Jesus instituted the Eucharist, commanding believers to “do this in remembrance of me.” Just as online banking provides access to financial resources, the Eucharist offers spiritual nourishment and a direct connection to Christ. The altar, upon which the Eucharist is consecrated, symbolizes both the cross and the table of the Last Supper.

Receiving the Eucharist signifies unity with Christ and the Church, fostering spiritual growth and eternal life, much like secure financial planning.

Marian Symbols and Their Significance

Marian symbols, like online banking access, offer convenience and security; they represent purity, grace, and devotion to the Virgin Mary, a central figure.

The Virgin Mary: Symbols of Purity and Grace

The Virgin Mary, a cornerstone of Catholic faith, is richly represented through numerous symbols embodying purity, grace, and her pivotal role in salvation history. Like the secure access provided by online banking, Marian symbolism offers a tangible connection to the divine. The lily, frequently depicted with Mary, signifies her immaculate conception and purity of heart. Her blue mantle represents heavenly grace and protection, mirroring the reliable services offered by financial institutions.

The closed garden, hortus conclusus, symbolizes Mary’s virginity and protected innocence. The star of the sea, Stella Maris, identifies her as a guiding light for believers, much like accessible online tools guide users through their finances. Unblemished mirrors symbolize her immaculate conception, reflecting God’s perfect grace. These symbols, passed down through centuries, aren’t merely artistic representations but profound theological statements, offering a visual language for understanding Mary’s unique holiness and her intercession for humanity.

The Rosary: A Symbolic Prayer Tool

The Rosary, far more than a simple prayer aid, is a deeply symbolic representation of Catholic faith and devotion, akin to the convenient access offered by modern online banking platforms. Each bead embodies a specific prayer – the Our Father and Hail Mary – forming a meditative rhythm that draws the faithful closer to God. The circular form symbolizes eternity and God’s unending love, mirroring the continuous availability of digital financial services.

The fifteen decades, traditionally representing the Joyful, Sorrowful, and Glorious Mysteries of Christ’s life, offer a comprehensive narrative of salvation history. The central crucifix reminds the believer of Christ’s sacrifice, while the pendant medal often depicts Mary, emphasizing her intercession. Like managing finances online, reciting the Rosary is a structured practice fostering spiritual discipline. It’s a tangible expression of faith, a powerful tool for contemplation, and a symbol of unity among Catholics worldwide.

Marian Monograms: Representations of Mary’s Name

Marian monograms, particularly the “AM” (Ave Maria) symbol, are elegant visual representations of the Virgin Mary’s name and her central role in Catholic belief, much like secure online banking provides access to financial details. These artistic depictions, often interwoven with crowns, flowers, or crosses, emerged during the medieval period as devotional images. The intertwined letters symbolize Mary’s humility and her acceptance of God’s will.

Variations exist, including the monogram incorporating three Marian symbols – a flower, a star, and a crown – each representing Mary’s virtues. These monograms weren’t merely aesthetic choices; they served as accessible symbols for the faithful, especially those who were illiterate. They adorned religious objects, vestments, and artwork, fostering a deeper connection with Mary. Similar to the ease of online banking, these symbols offered a readily recognizable and deeply meaningful expression of faith, promoting devotion and contemplation.

Symbols Related to Saints and Angels

Saints and angels are visually identified through symbolic attributes, mirroring secure online banking access—conveniently managing finances with digital tools and services.

Haloes and Aureoles: Symbols of Holiness

Haloes and aureoles, radiant circles or ovals surrounding the heads of saints, angels, and divine figures, are potent symbols of holiness, grace, and divine illumination within Catholic iconography. These luminous representations aren’t merely decorative; they signify a person’s closeness to God and their participation in the divine light. The halo, typically a complete circle, often denotes perfect sanctity, while the aureole, an oval or almond-shaped radiance, can indicate a specific moment of divine manifestation or glory.

Historically, the use of haloes evolved, influenced by artistic conventions and theological understandings. Early Christian art borrowed the halo from Roman imperial imagery, initially reserved for Christ, then extended to the Virgin Mary and eventually to saints. The color of the halo can also carry symbolic weight; gold represents divine majesty, while other colors might signify specific virtues or qualities. Just as online banking provides secure access to financial accounts, haloes visually communicate spiritual access to the divine realm, offering a glimpse into the sacred and eternal.

Specific Saint Attributes: Identifying Symbols

Each saint within the Catholic tradition is often associated with specific attributes – objects, symbols, or even animals – that serve as visual identifiers and represent their life, martyrdom, or patronage. These aren’t arbitrary choices; they’re rooted in the saint’s story and the virtues they embody. For example, Saint Peter is frequently depicted with keys, symbolizing his role as the gatekeeper of Heaven, while Saint Lawrence carries a gridiron, referencing his martyrdom by being grilled to death.

Similarly, Saint Sebastian is shown pierced with arrows, and Saint Catherine of Alexandria holds a wheel, both alluding to their methods of execution. These attributes function much like the features of online banking – providing quick identification and access to specific information. Just as a banking app icon instantly signifies financial services, a saint’s attribute immediately conveys their identity and the story behind their sanctity, aiding recognition and devotion. These symbols enrich the visual language of faith.

Angelic Representations: Symbols of Divine Messengers

Angels, as divine messengers in Catholic iconography, are rarely depicted with realistic features. Instead, they are commonly portrayed with wings – symbolizing their ability to transcend earthly boundaries and swiftly carry God’s messages. Their radiant appearance, often achieved through golden halos or shimmering garments, signifies their purity and closeness to the divine light. Like secure online banking access, angels represent a direct connection to a higher power.

Frequently, angels are shown holding lilies, representing purity and resurrection, or trumpets, announcing important events or judgments. Their youthful and androgynous forms emphasize their spiritual nature, detached from earthly concerns. The depiction of angels mirrors the convenience of modern financial tools – offering a clear, symbolic representation of an intangible force. Just as banking apps provide instant access, angels embody immediate divine intervention and communication.

Liturgical Symbols and Their Meanings

Liturgical symbols, like online banking features, offer accessible financial control; colors denote specific seasons, incense signifies prayer, and water embodies purification rituals.

Colors of the Liturgical Year: Symbolic Representations

The liturgical year’s colors are far from arbitrary; they represent profound theological meanings, guiding the faithful through the seasons of the Church’s life. Violet, often used during Advent and Lent, symbolizes penance, preparation, and a subdued expectation. It reflects a time of spiritual reflection and repentance, mirroring the anticipation of Christ’s coming or the solemnity of his Passion.

White, conversely, signifies joy, purity, and triumph. It’s employed during Easter, Christmas, and feasts of the Lord and of saints not martyrs. Gold can also be used, particularly on more solemn occasions, emphasizing the regal glory of God. Red represents the Holy Spirit, fire, and the blood of martyrs. It’s used on Pentecost, feasts of martyrs, and Good Friday, signifying sacrifice and fervent love.

Green, the color of hope and growth, dominates Ordinary Time, representing the ongoing life of the Church and the nurturing of faith. These colors aren’t merely decorative; they are visual reminders of the spiritual realities being celebrated, much like accessible online banking provides clear financial overviews.

Incense: Symbol of Prayer and Purification

The rising smoke of incense in Catholic liturgy is a powerful symbol with ancient roots, representing the prayers of the faithful ascending to God. Just as online banking offers secure access to financial matters, incense creates a sacred atmosphere conducive to prayer and reverence. Its fragrant aroma signifies holiness and purification, recalling the Old Testament offerings and foreshadowing the perfect sacrifice of Christ.

Historically, incense was used to cleanse and consecrate spaces and objects, symbolizing the removal of sin and the sanctification of creation. The act of incensing people and objects acknowledges their dignity and invites God’s blessing. The swirling smoke also visually represents the Holy Spirit, enveloping the congregation in a sense of divine presence.

Furthermore, incense’s use connects the earthly realm with the heavenly, mirroring the Church’s role as a mediator between God and humanity, much like convenient digital services bridge access to banking.

Water: Symbol of Baptism and Cleansing

Water holds profound significance in Catholic symbolism, primarily representing purification and new life through the sacrament of Baptism. Similar to secure online banking providing clarity to finances, water washes away original sin, initiating individuals into the Christian faith and offering a fresh start. This echoes the biblical flood, a cleansing of the world, and foreshadows spiritual renewal.

Beyond Baptism, water is used in blessings, signifying God’s grace and protection. Sprinkling holy water recalls the cleansing power of God’s word and safeguards against evil. It’s a tangible reminder of God’s constant presence and loving care.

Water’s life-giving properties also symbolize the Holy Spirit, the source of all life and grace. Just as water sustains physical life, the Holy Spirit nourishes spiritual life, empowering believers to live according to God’s will, mirroring accessible banking services sustaining financial wellbeing.

Architectural and Artistic Symbols

Basilicas and iconography, like secure online banking, offer accessible financial management, representing faith through art and structure, embodying spiritual and practical convenience.

The Basilica: Symbolic Architectural Form

The basilica, originating as a Roman public building, transitioned into a significant church architectural form, embodying both civic and spiritual importance. Early Christian basilicas, adapted from Roman models, provided ample space for growing congregations and facilitated liturgical practices. Their longitudinal plan, featuring a nave, aisles, and an apse, symbolically represents the journey of faith – a progression towards the altar symbolizing heaven.

Architectural elements within a basilica carry symbolic weight. The high ceilings inspire awe and reverence, directing the gaze upwards towards the divine. Columns often represent the apostles, supporting the structure of the Church. Mosaics and artwork adorning the walls narrate biblical stories and reinforce theological teachings, functioning much like accessible online banking interfaces providing clear financial information. The basilica’s grandeur reflects the majesty of God and the importance of communal worship, mirroring the convenience and security of modern financial tools.

Furthermore, the basilica’s design fosters a sense of unity and shared faith among worshippers, much like a unified banking experience.

Iconography: Symbolic Representations in Art

Iconography within Catholic art serves as a visual language, communicating theological truths and narratives to the faithful, much like clear online banking statements convey financial details. These symbolic representations aren’t merely decorative; they are didactic tools, teaching through imagery. Specific colors, gestures, and objects carry established meanings, understood across centuries.

For example, gold often signifies divinity, while red represents Christ’s passion or the Holy Spirit. The positioning of figures, their clothing, and accompanying symbols all contribute to the artwork’s overall message. Saints are frequently identified by attributes – Saint Peter with keys, Saint Lawrence with a gridiron – functioning as visual identifiers, similar to secure login credentials for online banking.

Iconographic programs in churches and cathedrals create a comprehensive visual theology, guiding worshippers through the stories of faith and reinforcing core beliefs, mirroring the comprehensive services offered by modern banking institutions.

Statues and Sculptures: Symbolic Representations of Faith

Catholic statues and sculptures transcend mere artistic expression, functioning as three-dimensional embodiments of faith and devotion, akin to the secure access provided by online banking apps. These figures – of Christ, Mary, saints, and angels – aren’t intended as literal representations, but as symbolic portals to the divine. Their poses, gestures, and attire are laden with meaning, communicating theological concepts and inviting prayerful contemplation.

The materials used – marble, wood, bronze – also contribute to the symbolism. Sculptures often depict pivotal moments in scripture or the lives of the saints, serving as visual aids for understanding and internalizing religious narratives, much like clear financial reports aid understanding.

Furthermore, statues and sculptures frequently adorn churches and homes, creating sacred spaces and fostering a tangible connection to the spiritual realm, mirroring the convenience of managing finances from any location.

bosch washing machine user guide

Bosch Washing Machine User Guide: A Comprehensive Overview (Updated 03/26/2026)

Today’s date is 03/26/2026 14:22:11; This manual initiates your experience with the Bosch Exxcel‚ ensuring successful operation and enjoyment of your upgraded Serie 4 machine.

Welcome! This user manual serves as your comprehensive guide to operating and maintaining your new Bosch washing machine. We are thrilled you’ve chosen Bosch‚ a brand synonymous with quality‚ innovation‚ and reliability in home appliances. This guide is specifically designed for the upgraded Bosch Serie 4 Washing Machine‚ and also applies to many Exxcel models‚ offering detailed instructions to maximize performance and longevity.

Before you begin‚ it’s crucial to correctly identify your specific model. Locate the model number and serial number‚ typically found on a sticker located on the inside of the door‚ or on the rear of the appliance. Record these numbers for future reference‚ particularly when contacting customer support or ordering replacement parts. Knowing your model number ensures you receive the most accurate and relevant assistance. This manual marks the beginning of your journey‚ guiding you towards successful operation and enjoyment.

Safety Precautions

Important Safety Instructions: Your safety is paramount. Before operating your Bosch washing machine‚ carefully read and understand all safety precautions outlined in this manual. Failure to adhere to these guidelines could result in personal injury or damage to the appliance.

Key Precautions: Never operate the machine if the power cord or plug is damaged. Ensure the appliance is properly grounded. Do not attempt to repair the machine yourself; contact qualified service personnel for any repairs. Keep children and pets away from the washing machine during operation. Never open the door during a wash cycle. Avoid contact with water inside the drum during or immediately after a cycle. Disconnect the appliance from the power supply before cleaning or performing maintenance. Always follow detergent manufacturer’s instructions and use only recommended detergents.

Initial Setup & Installation

Preparing for Installation: Before commencing installation‚ ensure you have all necessary components – the washing machine‚ water inlet hoses‚ drain hose‚ and this user guide. Verify the electrical outlet meets the machine’s power requirements. A dedicated‚ grounded outlet is crucial for safe operation.

Step-by-Step Guide: Begin by removing all shipping bolts and packaging materials. Carefully inspect the machine for any transit damage. Position the washing machine on a firm‚ level surface. Adjust the leveling feet to eliminate any wobble. Connect the water inlet hoses to both the machine and the water supply‚ ensuring tight connections to prevent leaks. Attach the drain hose securely to a suitable drain point. Finally‚ confirm all connections are secure before powering on the appliance.

Unpacking and Inspection

Careful Unboxing: Upon delivery‚ carefully unpack your new Bosch washing machine. Retain the original packaging materials for potential future transport or warranty claims. Inspect the exterior of the machine for any visible signs of damage incurred during shipping‚ such as dents‚ scratches‚ or broken parts.

Component Verification: Cross-reference the included components with the packing list. Ensure all items – the washing machine itself‚ water inlet hoses‚ drain hose‚ user manual‚ and any accessories – are present. Critically‚ locate and remove all shipping bolts and protective packaging inside the drum. Failure to remove these can cause significant damage during operation. Document any discrepancies or damage immediately and contact your retailer or Bosch customer support.

Positioning and Leveling

Optimal Placement: Position your Bosch washing machine on a firm‚ level floor capable of supporting its weight‚ especially when fully loaded with laundry. Avoid placing it in areas with excessive moisture or direct sunlight. Ensure sufficient space around the machine for proper ventilation and to facilitate easy access for maintenance and loading/unloading.

Achieving Stability: Utilize a spirit level to verify the machine’s levelness. Adjust the adjustable feet at the base of the machine until it is perfectly level‚ both front-to-back and side-to-side. Proper leveling minimizes vibration and noise during operation‚ extending the machine’s lifespan. Secure the locking nuts on the feet after leveling to prevent accidental movement. An unstable machine can ‘walk’ during cycles‚ causing damage.

Connecting Water Supply & Drain Hose

Water Inlet Connection: Carefully connect the supplied water inlet hose to both the washing machine’s inlet valve and a suitable water tap. Ensure the connections are tight to prevent leaks. Use new supply hoses if the old ones show any signs of wear. A dedicated water tap is recommended for optimal performance and to avoid interruptions.

Drain Hose Installation: Position the drain hose securely into a standpipe or laundry sink‚ ensuring it’s at the correct height as specified in the manual to prevent siphoning. Avoid kinks or sharp bends in the hose‚ as these can restrict water flow. Secure the hose to prevent it from dislodging during operation. Regularly inspect the drain hose for any damage or blockages.

Understanding Your Bosch Washing Machine Control Panel

Overview: Your Bosch washing machine features an intuitive control panel designed for ease of use. The central dial selects wash programs – Cotton‚ Delicates‚ Wool‚ Quick Wash‚ and more – each tailored for specific fabric types and soil levels. Digital displays clearly indicate the selected program‚ remaining time‚ temperature‚ and spin speed.

Key Buttons & Indicators: Familiarize yourself with buttons like ‘Start/Pause’‚ ‘Temperature’‚ ‘Spin Speed’‚ and ‘Options’. Indicator lights signal the machine’s status – running‚ paused‚ or completed. Special function buttons activate features like ‘EcoSilence Drive’ or ‘AntiStain’. The ‘Delay Start’ function allows you to schedule washes for convenience. Consult the program guide for detailed settings and optimal results.

Detergent & Fabric Softener Dispenser Guide

Compartment Breakdown: The Bosch detergent dispenser typically features three compartments. Compartment I‚ often marked with “I” or a Roman numeral‚ is for pre-wash detergent – use this only when a pre-wash cycle is selected. Compartment II‚ usually indicated by “II”‚ is for the main wash detergent; powder‚ liquid‚ or pods are suitable here. Compartment ✱ or a flower symbol is reserved for fabric softener.

Dosage & Compatibility: Always refer to the detergent manufacturer’s instructions for correct dosage‚ adjusting based on load size and soil level. Bosch machines are compatible with various detergent types‚ including powder‚ liquid‚ and pods. Avoid overfilling compartments‚ as this can lead to residue and reduced cleaning performance. Never pour detergent directly into the drum.

Types of Detergent Compatible with Bosch Machines

Powder Detergents: Bosch washing machines readily accept powder detergents‚ offering a cost-effective cleaning solution. Ensure the powder dissolves completely‚ especially in colder water temperatures‚ to prevent residue on clothes. Use the appropriate amount based on water hardness and load size.

Liquid Detergents: Liquid detergents are popular for their ease of use and quick dissolving properties. They are particularly effective at removing greasy stains and are suitable for all water temperatures. Bosch machines handle liquid detergents efficiently‚ delivering consistent results.

Detergent Pods/Capsules: Convenient and pre-measured‚ detergent pods are a hassle-free option. Place pods directly into the drum before adding clothes. Avoid using pods with certain programs like short washes‚ as they may not fully dissolve. Always check the pod packaging for compatibility guidelines.

Correct Dosage & Compartment Usage

Compartment I (Pre-wash): Use this compartment for detergent when selecting a pre-wash program‚ ideal for heavily soiled items. Add detergent only if a pre-wash is activated.

Compartment II (Main Wash): This is where you’ll add detergent for the main wash cycle. The amount depends on load size and soil level – refer to the detergent packaging for guidance. For liquid detergents‚ follow the fill lines within the compartment.

Compartment III (Fabric Softener): Reserved exclusively for fabric softener. Do not overfill; the softener will be dispensed automatically during the rinse cycle. Avoid direct contact of fabric softener with clothes‚ as it can cause staining. Always dilute concentrated fabric softener with water before adding.

Dosage Considerations: Water hardness significantly impacts detergent effectiveness. Hard water requires more detergent than soft water. Adjust dosage accordingly to achieve optimal cleaning results and prevent residue buildup.

Washing Machine Programs Explained

Your Bosch washing machine offers a variety of programs tailored to different fabric types and soil levels. Understanding these programs ensures optimal cleaning and garment care. The Cotton Program is designed for everyday cotton items‚ offering adjustable temperature and spin speed settings for customized cleaning.

For delicate fabrics‚ the Delicate/Silk Program provides a gentle wash cycle with reduced mechanical action‚ protecting sensitive materials. The Wool Program is specifically engineered for woollens‚ utilizing a delicate wash and low spin speed to prevent shrinkage and damage.

Need a quick refresh? The Quick Wash/Express Program is perfect for lightly soiled items‚ delivering a fast and efficient wash in under an hour. Explore additional programs like synthetics‚ dark wash‚ and allergy plus for specialized cleaning needs.

Cotton Program – Detailed Settings

The Bosch Cotton Program offers extensive customization for optimal results. Temperature selection ranges from cold wash (15°C) to high heat (90°C)‚ catering to varying soil levels and fabric care needs. Adjust the spin speed from No Spin to Maximum (1600 rpm) to control moisture retention – lower speeds for delicate cottons‚ higher for quicker drying.

Stain removal options‚ like pre-wash‚ enhance cleaning power for stubborn marks. Utilize the Eco mode to conserve water and energy without compromising cleanliness. The IronEasy option reduces creasing‚ simplifying ironing. For heavily soiled items‚ select the Intensive stain setting.

Consider the soil level setting – lightly soiled‚ normally soiled‚ or heavily soiled – to optimize wash duration and detergent usage. Remember to consult garment care labels before selecting settings.

Delicate/Silk Program – Gentle Care

The Bosch Delicate/Silk program is engineered for the most sensitive fabrics‚ ensuring gentle cleaning and preventing damage. This program utilizes a reduced drum action and lower water temperature (typically max 30°C) to minimize stress on delicate fibers. Spin speed is automatically limited to protect fabric integrity‚ generally not exceeding 800 rpm.

Always use a liquid detergent specifically designed for delicates; powder detergents may not dissolve completely and can leave residue. Avoid using bleach or fabric softener‚ as these can harm delicate materials. The program duration is extended to allow for thorough yet gentle cleaning.

Hand-washable items‚ silk garments‚ and lingerie are ideal candidates for this program. Always check the garment’s care label before washing‚ and consider using a laundry bag for added protection against snagging or stretching.

Wool Program – Protecting Your Woollens

The Bosch Wool Program is specifically designed to care for your wool garments‚ preventing shrinkage and maintaining their natural softness. This program employs an extremely gentle wash action and consistently low water temperature (typically around 30°C) to safeguard wool fibers. The spin speed is significantly reduced‚ often below 600 rpm‚ to minimize stretching and distortion.

Only use detergents specifically formulated for wool‚ as regular detergents can damage the delicate fibers. Avoid using bleach or fabric softener. The program duration is longer to ensure thorough cleaning without aggressive agitation.

Wool sweaters‚ scarves‚ and blankets are suitable for this program‚ provided they are labeled as machine washable. For extra protection‚ place woollens inside a mesh laundry bag. Always check the garment’s care label before washing‚ and never overload the machine.

Quick Wash/Express Program – For Lightly Soiled Items

The Bosch Quick Wash/Express Program is ideal for refreshing lightly soiled laundry when time is of the essence. This program delivers a complete wash cycle in a significantly reduced timeframe – typically between 15 and 30 minutes – without compromising cleaning performance. It utilizes increased water flow and a moderate wash action to quickly remove surface dirt and odors.

This program is best suited for items like t-shirts‚ blouses‚ and everyday clothing that haven’t accumulated heavy staining. Avoid overloading the machine‚ as this can hinder effective cleaning. Use a small amount of detergent appropriate for a quick wash cycle.

While efficient‚ the Quick Wash program doesn’t offer the same level of deep cleaning as longer‚ more intensive cycles. It’s a perfect solution for a quick refresh‚ but for heavily soiled items‚ a standard program is recommended.

Special Functions & Options

Bosch washing machines offer a range of special functions designed to enhance your laundry experience and cater to specific needs. The EcoSilence Drive technology ensures exceptionally quiet operation and superior energy efficiency‚ minimizing noise pollution and reducing your environmental impact. This innovative motor design also contributes to the machine’s long-term durability.

The AntiStain function is a powerful tool for tackling stubborn stains like red wine‚ grass‚ or chocolate. This program utilizes a specifically optimized wash process‚ adjusting temperature and drum movements to effectively lift and remove difficult blemishes. It’s recommended to treat stains as quickly as possible for optimal results.

Additional options may include delay start‚ allowing you to schedule washes for convenient times‚ and extra rinse‚ providing enhanced allergen removal. Explore your machine’s control panel to discover the full spectrum of available features.

EcoSilence Drive – Energy Efficiency

The EcoSilence Drive is a hallmark of Bosch washing machine technology‚ representing a significant advancement in motor design. Unlike conventional motors‚ the EcoSilence Drive operates with remarkably quiet efficiency‚ minimizing disruptive noise during laundry cycles. This brushless‚ direct-drive motor utilizes magnetic levitation‚ reducing friction and wear‚ ultimately extending the lifespan of your appliance.

Beyond quiet operation‚ the EcoSilence Drive contributes substantially to energy savings. By optimizing power consumption‚ it helps lower your electricity bills and reduces your environmental footprint. Bosch machines equipped with this technology consistently achieve high energy efficiency ratings‚ often exceeding industry standards.

Furthermore‚ the precise motor control allows for optimized drum movements‚ enhancing wash performance and fabric care. It’s a key component in Bosch’s commitment to sustainable and effective laundry solutions.

AntiStain – Removing Stubborn Stains

Bosch washing machines featuring the AntiStain system offer a targeted solution for tackling persistent and challenging stains. This innovative function automatically adjusts washing parameters – including temperature‚ drum movement‚ and soak times – to effectively remove a variety of common stains‚ such as blood‚ grass‚ red wine‚ and chocolate;

The AntiStain program doesn’t require pre-treating stains; simply select the appropriate stain type from the machine’s control panel‚ and the washing machine will do the rest. This intelligent system optimizes the cleaning process‚ ensuring thorough stain removal while protecting your fabrics.

It’s important to note that the AntiStain function is most effective when used on fresh stains. While it can significantly improve the removal of set-in stains‚ results may vary depending on the stain’s age and severity. Always consult the garment’s care label before using this feature.

Troubleshooting Common Issues

Encountering issues with your Bosch washing machine can be frustrating‚ but many problems have simple solutions. If your machine won’t start‚ check the power supply and ensure the door is securely closed. A common issue is a blocked drain filter‚ causing water to remain in the drum – locate and clean the filter regularly.

Error codes displayed on the control panel indicate specific problems; consult the full user manual for a detailed explanation of each code. Leaking water often points to loose hose connections or an overloaded drum. Unusual noises during operation could signify foreign objects trapped within the drum or a problem with the motor.

Before contacting customer support‚ try resetting the machine by unplugging it for a few minutes. Remember to always prioritize safety and avoid attempting repairs yourself if you are not qualified.

Cleaning & Maintenance

Regular cleaning and maintenance are crucial for prolonging the life and efficiency of your Bosch washing machine. Wipe down the exterior with a damp cloth and mild detergent to prevent grime buildup. Pay particular attention to the detergent dispenser drawer‚ removing any residue regularly to ensure optimal performance.

The rubber door seal should be inspected and cleaned frequently to prevent mold and mildew growth. Leaving the door slightly ajar after each wash cycle promotes ventilation and reduces moisture. Additionally‚ periodically clean the water inlet filters to prevent blockages and maintain water flow.

For optimal hygiene‚ consider running a drum cleaning cycle with a dedicated washing machine cleaner every few months. This helps eliminate bacteria and odors‚ keeping your machine fresh and your clothes clean.

Drum Cleaning – Keeping Your Machine Fresh

Maintaining a fresh and hygienic drum is vital for optimal washing performance and preventing unpleasant odors. Bosch recommends performing a dedicated drum cleaning cycle approximately every three months‚ or more frequently with heavy use. Utilize a commercially available washing machine cleaner specifically designed for drum cleaning.

Before initiating the cycle‚ ensure the drum is empty. Add the cleaning solution to the detergent dispenser‚ following the manufacturer’s instructions on the cleaner packaging. Select the highest temperature drum cleaning program available on your Bosch machine – typically a hot wash cycle.

This process effectively removes detergent residue‚ fabric softener buildup‚ and potential mold or mildew growth within the drum; A clean drum ensures your laundry remains fresh and free from contaminants‚ extending the lifespan of your Bosch washing machine.

cen tech digital multimeter manual español

Cen-Tech digital multimeters are vital tools‚ offering accuracy for both professionals and hobbyists; Spanish manuals ensure safe and effective operation of the device.

1.1 Overview of the Cen-Tech Digital Multimeter

The Cen-Tech digital multimeter stands as a portable and user-friendly device‚ meticulously engineered for the precise measurement of crucial electrical parameters. It’s an essential instrument for electricians‚ DIY enthusiasts‚ and anyone requiring reliable electrical testing capabilities. Harbor Freight Tools‚ the copyright holder of the user manual‚ emphasizes detailed instructions for effective utilization.

This multimeter’s versatility allows for measurements of voltage‚ current‚ and resistance‚ making it suitable for a wide array of applications. The availability of Spanish manuals is particularly important‚ ensuring accessibility and comprehension for a broader user base. Proper operation and adherence to safety guidelines‚ as outlined in the manual‚ are paramount for preventing accidents and ensuring accurate readings. Regular inspection of the product before each use is also highly recommended.

1.2 Importance of the Spanish Manual

The availability of a Spanish manual for the Cen-Tech digital multimeter is critically important for ensuring user safety and accurate operation among Spanish-speaking individuals. Electrical work carries inherent risks‚ and clear‚ understandable instructions are paramount to prevent accidents and misinterpretations. A language barrier can significantly increase the potential for errors when dealing with electrical measurements.

Providing a Spanish version of the manual demonstrates a commitment to inclusivity and accessibility‚ allowing a wider range of users to confidently and safely utilize the multimeter’s features. It ensures that all users‚ regardless of their primary language‚ have access to the necessary information regarding safety precautions‚ operating procedures‚ and troubleshooting tips. This ultimately promotes responsible use and minimizes the risk of damage to the instrument or harm to the operator.

Safety Precautions

Always prioritize safety when using the Cen-Tech multimeter; inspect before use‚ avoid exceeding 20 amps‚ and never switch modes while connected to a circuit.

2.1 General Safety Warnings

Important safety precautions are crucial when operating the Cen-Tech digital multimeter. Always read and understand the entire manual before use to prevent potential hazards. Never operate the multimeter with damaged probes or leads‚ as this could lead to inaccurate readings or electrical shock. Ensure your hands and the test leads are dry during measurements.

Do not attempt to measure voltages or currents exceeding the multimeter’s specified limits. This can damage the instrument and pose a serious safety risk. Avoid working in wet or damp environments‚ and always disconnect the multimeter from any circuit before making changes or adjustments.

Furthermore‚ be cautious when working with live circuits‚ and always assume they are energized. Never open the multimeter case while it is connected to a circuit. Keep the multimeter away from children and unauthorized personnel. Regular inspection of the device is vital for continued safe operation. Remember to call 1-888-866-5797 for technical questions.

2.2 Specific Precautions for Electrical Measurements

When measuring voltage‚ ensure the multimeter is set to the appropriate voltage range before connecting to the circuit. Never attempt to measure voltage on circuits exceeding the multimeter’s maximum input voltage. For current measurements‚ always start with the highest current range and decrease it as needed to obtain an accurate reading.

Crucially‚ do not test current on circuits exceeding 20 amps‚ as this will likely blow the fuse. Avoid switching between testing modes while the multimeter is connected to a live circuit; disconnect first. When measuring resistance‚ always ensure the circuit is de-energized.

Inspect the fuse regularly and replace it only with the specified type and rating. Improper fuse replacement can compromise safety. Be aware of potential hazards associated with high-voltage circuits and take appropriate precautions. Remember to disconnect the multimeter before battery replacement. For technical assistance‚ contact 1-888-866-5797.

Understanding the Multimeter Components

The Cen-Tech multimeter features a display‚ rotary switch for function selection‚ and input jacks for connecting test leads to measure electrical parameters effectively.

3.1 Display and Indicators

The Cen-Tech digital multimeter’s display is crucial for reading measurements accurately. It typically features a large‚ backlit LCD screen for clear visibility in various lighting conditions. Key indicators on the display provide essential information about the selected function and measurement status.

Common indicators include a low battery symbol‚ alerting the user when the battery needs replacement. An overload indicator warns of exceeding the multimeter’s measurement range‚ preventing damage to the device. A data hold button freezes the current reading on the display for convenient recording. Polarity indication (+ or -) shows the direction of current flow or voltage.

Additionally‚ the display shows the selected unit of measurement (e.g.‚ Volts‚ Amps‚ Ohms) and the measurement value itself. Understanding these indicators is fundamental to operating the multimeter safely and interpreting the results correctly‚ especially when referencing the Spanish manual for detailed explanations.

3.2 Rotary Switch Functions

The rotary switch on the Cen-Tech digital multimeter is the primary control for selecting the desired measurement function. Rotating the switch aligns the pointer with different settings‚ enabling measurements of DC and AC voltage‚ DC and AC current‚ resistance‚ continuity‚ and sometimes other parameters like diode testing or capacitance.

Each setting on the switch corresponds to a specific measurement type and range. Selecting the appropriate range is crucial for accurate readings; auto-ranging models simplify this process. The Spanish manual provides a detailed diagram of the rotary switch‚ clearly labeling each function and its corresponding symbols.

Incorrectly setting the switch can lead to inaccurate results or even damage the multimeter. Always double-check the selected function before connecting the test leads to the circuit. Familiarizing yourself with the rotary switch functions‚ as outlined in the user guide‚ is essential for safe and effective operation.

3.3 Input Jacks and Their Uses

The Cen-Tech digital multimeter features several input jacks‚ each designated for specific measurement purposes. Typically‚ there’s a “COM” (common) jack‚ which serves as the reference ground for all measurements. Another jack is labeled “VΩmA‚” used for voltage‚ resistance‚ and low-current measurements (milliamps). A separate jack‚ often marked “10A” or “20A” (depending on the model)‚ is dedicated to high-current measurements.

The Spanish manual clearly illustrates the location and function of each input jack. Incorrectly connecting the test leads to the wrong jacks can result in inaccurate readings or potentially damage the multimeter or the circuit under test. For example‚ attempting to measure high current through the “VΩmA” jack will likely blow the internal fuse.

Always consult the manual to confirm the correct jack for each measurement type. Proper connection of the test leads ensures accurate and safe operation of the multimeter.

Basic Measurements: Voltage

Measuring voltage‚ both DC and AC‚ is a fundamental function of the Cen-Tech multimeter; the Spanish manual guides users through these essential procedures safely.

4.1 Measuring DC Voltage

To accurately measure DC voltage with your Cen-Tech digital multimeter‚ consult the Spanish manual for detailed instructions and safety precautions. Begin by turning the rotary switch to the DC voltage (VDC) range that exceeds your expected measurement. Insert the black test lead into the COM jack and the red test lead into the VΩmA jack.

Carefully connect the test leads in parallel with the circuit or component you wish to measure – red lead to the positive (+) terminal and black lead to the negative (-) terminal. Observing proper polarity is crucial for an accurate reading; reversed polarity will display a negative sign. The multimeter will then display the DC voltage value on the screen.

Always start with the highest voltage range and decrease it for better resolution‚ if needed. Remember to never measure voltages exceeding the multimeter’s maximum input rating to avoid damage. The Spanish manual provides diagrams and troubleshooting tips for common issues encountered during DC voltage measurements‚ ensuring safe and reliable operation.

4.2 Measuring AC Voltage

For measuring AC voltage using your Cen-Tech digital multimeter‚ refer to the Spanish manual for comprehensive guidance and safety protocols. Rotate the rotary switch to the AC voltage (VAC) range‚ selecting a range higher than the anticipated voltage. Connect the black test lead to the COM jack and the red test lead to the VΩmA jack‚ ensuring secure connections.

Carefully connect the test leads across the AC circuit or component. Unlike DC voltage‚ polarity doesn’t matter when measuring AC voltage. The multimeter will display the AC voltage value on the screen. Begin with the highest VAC range and decrease it for a more precise reading‚ if necessary.

Always prioritize safety and avoid exceeding the multimeter’s maximum AC voltage input rating. The Spanish manual details potential hazards and provides troubleshooting advice for accurate AC voltage measurements. Remember to inspect the test leads for any damage before use‚ ensuring reliable and safe operation.

Measuring Current

The Cen-Tech multimeter‚ as detailed in the Spanish manual‚ measures current; avoid exceeding 20 amps to prevent blowing the internal fuse for safety.

5.1 Measuring DC Current

To accurately measure DC current using your Cen-Tech digital multimeter‚ consult the Spanish manual for detailed instructions and safety guidelines. First‚ ensure the multimeter is set to the DC current (A or mA) range appropriate for the expected current flow. It’s crucial to break the circuit to insert the multimeter in series – meaning the current must flow through the meter‚ not across its terminals.

Connect the black test lead to the COM (common) jack and the red test lead to the appropriate current jack (usually marked A for amps and mA for milliamps). Never connect the multimeter directly across a voltage source when set to measure current; this will likely blow the fuse. Always start with the highest current range and work downwards for a more precise reading. The Spanish manual emphasizes the importance of understanding the circuit before making any connections.

Observe the display‚ noting the polarity; a negative reading indicates reverse current flow. Remember‚ exceeding the selected range will blow the fuse‚ requiring replacement. Refer to the manual for the correct fuse specification. Prioritize safety and double-check all connections before energizing the circuit.

5.2 Measuring AC Current (and Fuse Protection)

Measuring AC current with your Cen-Tech digital multimeter requires careful attention to both procedure and safety‚ as detailed in the Spanish manual. Begin by selecting the AC current (A or mA) range on the rotary switch‚ ensuring it’s appropriate for the anticipated current level. Similar to DC current measurement‚ you must break the circuit and connect the multimeter in series with the load.

Connect the black test lead to the COM jack and the red lead to the designated AC current jack. The Spanish manual strongly cautions against connecting the meter across a voltage source while in current mode – this will almost certainly blow the fuse; Start with a higher range and decrease it for better resolution.

Fuse protection is critical. If the display shows “OL” or no reading‚ and you’ve verified the connections‚ the fuse is likely blown. The manual specifies the correct fuse type and amperage for replacement. Never attempt to bypass the fuse. Always consult the Spanish manual for detailed troubleshooting and safety precautions before attempting any electrical measurements.

Measuring Resistance

The Cen-Tech multimeter‚ as explained in the Spanish manual‚ accurately measures resistance; ensure the circuit is de-energized for safe and precise readings.

6.1 Resistance Measurement Procedure

To accurately measure resistance with your Cen-Tech digital multimeter‚ as detailed in the Spanish manual‚ begin by ensuring the circuit is completely de-energized. This is a crucial safety step to prevent damage to the multimeter and ensure accurate readings. Disconnect the component you intend to measure from any power source or surrounding circuitry.

Select the resistance measurement function on the rotary switch‚ typically denoted by the Omega (Ω) symbol. Choose the appropriate range; if the resistance value is unknown‚ start with the highest range and decrease it until a precise reading is obtained. Connect the test leads to the component – polarity doesn’t matter for resistance measurements.

Observe the display. The manual emphasizes that a reading of “OL” or “1.” indicates an open circuit or that the resistance is higher than the selected range. Adjust the range accordingly. Remember to note the unit of measurement (Ohms‚ kOhms‚ or MOhms) displayed alongside the numerical value. Always double-check connections and the selected range for reliable results.

6.2 Understanding Resistance Values

The Cen-Tech digital multimeter‚ as explained in the Spanish manual‚ displays resistance values using prefixes to represent larger units. Understanding these is key to interpreting readings correctly. Ohms (Ω) are the base unit‚ measuring opposition to current flow. Kilohms (kΩ) represent 1‚000 Ohms‚ and Megohms (MΩ) signify 1‚000‚000 Ohms.

Lower resistance values indicate easier current flow‚ while higher values signify greater opposition. A reading close to zero suggests a short circuit‚ while a very high or “OL” reading indicates an open circuit. Component tolerances‚ detailed in datasheets‚ are important; a resistor labeled “100Ω ±5%” can measure between 95Ω and 105Ω and still be within specification.

The manual stresses that environmental factors like temperature can influence resistance. Always compare measured values to expected ranges based on the component’s specifications. Accurate interpretation of resistance values is crucial for troubleshooting and verifying circuit functionality.

fire lite ann 80 manual

Fire Lite ANN-80 Manual: A Comprehensive Guide (Updated 03/09/2026)

Today is 03/09/2026 23:12:22 (). This manual details installation, operation, and troubleshooting for Fire-Lite ANN-80 remote annunciators, ensuring system reliability and safety.

The Fire-Lite ANN-80 is a remote annunciator designed to provide a clear and concise display of fire alarm system status in locations distant from the main Fire Alarm Control Panel (FACP). This manual serves as a comprehensive guide for installers, technicians, and end-users, detailing everything from mounting procedures and wiring configurations to operational functionality and troubleshooting steps.

As of today, March 9th, 2026, the ANN-80 remains a vital component in many Fire-Lite systems, offering a user-friendly interface for monitoring system points. Its compact design and backlit LCD display ensure visibility even in low-light conditions. Understanding the ANN-80’s capabilities, including its disable switch and trouble LED, is crucial for effective fire safety management. This guide will empower you to maximize the benefits of your Fire-Lite ANN-80 system.

What is the ANN-80?

The Fire-Lite ANN-80 is a remote LCD annunciator, functioning as a secondary display mirroring the information presented on the primary FACP. It’s designed for compact installations, offering a clear, backlit LCD screen to display system point status in English. This allows personnel in various locations to quickly assess the state of the fire alarm system without needing direct access to the main control panel.

Essentially, the ANN-80 extends the visibility of the FACP’s information. It’s compatible with a range of Fire-Lite FACP models, including the MRP2002E, and features a disable switch alongside a dedicated disable trouble LED for enhanced control and diagnostics. The ANN-80 isn’t a control panel itself, but a vital extension, providing crucial situational awareness during fire events.

Key Features of the ANN-80 Remote Annunciator

The Fire-Lite ANN-80 boasts several key features enhancing fire alarm system management. Its compact design facilitates installation in diverse environments, while the backlit LCD display ensures clear visibility, even in low-light conditions. Crucially, it mirrors the FACP display, presenting system point status in easily understandable English text.

A prominent disable switch allows for immediate silencing of the annunciator during testing or maintenance, complemented by a dedicated disable trouble LED indicating when the disable function is active. Compatibility with various Fire-Lite FACP models, like the MRP2002E, provides flexible integration options. Its robust construction ensures durability, and it supports network considerations for addressing within larger systems.

Installation Procedures

Proper installation involves secure mounting, careful wiring to the FACP, and adherence to specified power supply requirements for optimal performance and reliability.

Mounting the ANN-80 Unit

The Fire-Lite ANN-80 is designed for flexible mounting options to suit various installation environments. Prior to mounting, ensure the selected location provides easy access for visual inspection of the LCD display and the disable switch. The unit can be surface mounted directly to a wall using appropriate screws and anchors, ensuring a secure and stable attachment.

Alternatively, it can be semi-recessed into a wall for a cleaner aesthetic. When semi-recessing, verify sufficient depth is available to accommodate the unit’s rear connections and wiring. Maintain a minimum clearance around the unit for adequate ventilation, preventing potential overheating. Avoid mounting near sources of extreme temperature, humidity, or physical damage.

Carefully consider the viewing angle and ambient lighting conditions to optimize display readability. Proper mounting contributes significantly to the overall functionality and longevity of the ANN-80 annunciator.

Wiring and Connections

Wiring the Fire-Lite ANN-80 requires careful attention to detail to ensure reliable communication with the Fire Alarm Control Panel (FACP). Utilize appropriately sized wiring, adhering to all local and national electrical codes. Typically, the ANN-80 connects to the FACP via a dedicated 4-wire communication bus – typically consisting of data positive, data negative, power, and ground.

Ensure proper polarity when connecting the power and ground wires. Incorrect polarity can damage the unit. The communication wiring should be run in a separate conduit from power wiring to minimize interference. Terminate all connections securely using approved connectors.

Refer to the FACP’s documentation for specific wiring diagrams and address settings. Double-check all connections before applying power to verify accuracy and prevent potential system malfunctions. Proper wiring is crucial for seamless integration and accurate system status reporting.

Power Supply Requirements

The Fire-Lite ANN-80 operates on a 24VDC power supply, typically sourced directly from the compatible Fire Alarm Control Panel (FACP). It’s crucial to verify the FACP’s power supply capacity is sufficient to support the additional load imposed by the ANN-80 annunciator. Insufficient power can lead to unreliable operation or complete failure of the display.

A dedicated power supply is recommended for optimal performance, minimizing the risk of voltage drops or interference from other devices. Ensure the power supply provides stable and regulated voltage within the specified range. Polarity must be strictly observed during connection – reverse polarity will likely damage the unit.

Consider utilizing a backup power source, such as a battery, to maintain operation during power outages. Always consult the FACP documentation for specific power supply recommendations and wiring instructions.

Operation and Functionality

The ANN-80 mimics the FACP display, showing system point status in English text; it features a disable switch and trouble LED for clear indication.

Understanding the LCD Display

The Fire-Lite ANN-80 utilizes a compact, backlit LCD display to provide a clear and concise representation of the fire alarm system’s status. This display mirrors the information presented on the main Fire Alarm Control Panel (FACP), offering remote visibility of critical events. The LCD screen is designed for easy readability, even in low-light conditions, ensuring personnel can quickly assess the situation.

Displayed information includes system point status – indicating which zones or devices are in alarm, trouble, or normal operation. The display’s format is designed to be intuitive, allowing for rapid interpretation of the system’s condition. The annunciator displays English-language text, simplifying understanding for all users. Proper understanding of the LCD display is crucial for effective response to fire alarm events, enabling swift and informed decision-making during emergencies.

System Point Status Display

The ANN-80’s LCD display meticulously presents the status of each system point – zones, devices, and initiating circuits – connected to the compatible Fire Alarm Control Panel (FACP). When a point activates, the display clearly indicates the location and nature of the event, such as “Zone 1 – Alarm” or “Smoke Detector – Trouble.” This detailed information allows personnel to pinpoint the source of the alarm quickly and efficiently.

The display mimics the FACP’s presentation, ensuring consistency and minimizing confusion. Normal, alarm, and trouble states are distinctly indicated, often using different colors or icons for immediate recognition. Understanding this point status display is paramount for effective fire safety management, enabling a targeted and informed response to any alarm condition. Accurate interpretation facilitates swift evacuation and fire suppression efforts.

Disable Switch and Trouble LED

The ANN-80 incorporates a disable switch, a crucial feature for silencing the annunciator during maintenance or testing procedures. When activated, this switch temporarily prevents audible alerts from the remote annunciator, without affecting the central FACP or other notification appliances. A dedicated disable trouble LED illuminates when the disable switch is engaged, providing a clear visual indication that the annunciator is temporarily silenced.

This trouble LED also signals other system faults or communication issues. A steady illumination indicates a general system trouble, while a flashing LED may signify a specific problem, such as a loss of communication with the FACP. Promptly addressing trouble conditions is vital for maintaining system integrity and ensuring reliable fire detection. Refer to the troubleshooting section for detailed guidance on interpreting and resolving trouble indications.

Troubleshooting Common Issues

This section provides solutions for typical ANN-80 problems, including display failures, communication errors with the FACP, and persistent trouble LED illumination for quick resolution.

ANN-80 Display Not Powering On

If the ANN-80 display fails to illuminate, begin by verifying the power supply connection at the unit itself. Ensure the wiring is secure and corresponds to the specified power requirements outlined in the installation section of this manual. Confirm that the Fire Alarm Control Panel (FACP) is actively supplying power to the remote annunciator circuit.

Next, inspect the fuse associated with the ANN-80’s power circuit – a blown fuse is a common cause of power loss. If the fuse is intact, use a multimeter to check the voltage at the ANN-80’s power terminals, confirming it matches the required voltage. A lack of voltage indicates a problem with the FACP or wiring. Finally, examine the disable switch; ensure it is not inadvertently activated, as this will cut power to the display. If issues persist, consult a qualified technician.

Communication Errors with FACP

Communication failures between the ANN-80 and the Fire Alarm Control Panel (FACP) typically manifest as a lack of updated system status or error messages on the annunciator display. First, meticulously check the wiring connecting the ANN-80 to the FACP’s communication bus, ensuring all connections are secure and free from corrosion. Verify the correct addressing scheme is configured for the ANN-80, as detailed in the network considerations section.

Confirm that the FACP is actively communicating on the network and that no other devices are causing interference. A multimeter can be used to test the communication lines for continuity. If the problem persists, attempt a system reset of both the ANN-80 and the FACP. Consult the FACP’s manual for specific reset procedures. If errors continue, professional assistance is recommended.

Trouble LED Illumination – Causes and Solutions

A lit Trouble LED on the ANN-80 indicates a system abnormality requiring attention. Common causes include communication faults with the FACP, a disabled annunciator state (due to the disable switch), or internal ANN-80 malfunctions. Initially, verify the annunciator isn’t intentionally disabled via the front-panel switch. If not, investigate communication issues as outlined in the previous section, checking wiring and addressing.

If communication appears normal, a persistent Trouble LED suggests an internal fault within the ANN-80 itself. Power cycle the unit; if the LED remains illuminated, contact qualified fire alarm service personnel for diagnosis and repair. Do not attempt internal repairs yourself, as this could compromise system integrity. Refer to the technical specifications for warranty information.

Technical Specifications

The Fire-Lite remote annunciators are compact with backlit LCD displays. Dimensions, weight, electrical characteristics, and environmental conditions are detailed below for reference.

Physical Dimensions and Weight

The Fire-Lite ANN-80 remote annunciator is designed for flexible installation in various environments. Its compact form factor allows for placement in locations where space is limited, without compromising visibility of critical system information. Specifically, the unit measures approximately 6.89 inches (175 mm) in width, 4.69 inches (119 mm) in height, and 2.13 inches (54 mm) in depth.

Regarding weight, the ANN-80 is remarkably lightweight, tipping the scales at only 1.6 pounds (0.73 kg). This minimal weight simplifies the mounting process and reduces strain on supporting surfaces. The robust construction, despite its light weight, ensures durability and resistance to physical impacts, contributing to long-term reliability in demanding fire alarm systems. These dimensions and weight are crucial for planning installations and ensuring proper integration within existing infrastructure.

Electrical Characteristics

The Fire-Lite ANN-80 operates on a 24 VDC power supply, commonly provided by the compatible Fire Alarm Control Panel (FACP). Its current draw is relatively low, typically consuming around 85mA during normal operation, and peaking at 150mA during backlighting activation. This efficient power usage minimizes the load on the FACP’s power supply, ensuring sufficient power for all connected devices.

The unit is designed to be polarity sensitive, requiring correct wiring to prevent damage. It utilizes a standard 4-wire connection for both power and communication with the FACP. The ANN-80 incorporates transient voltage suppression to protect against electrical surges and spikes, enhancing its reliability in harsh electrical environments. Proper grounding is essential for optimal performance and safety, adhering to local electrical codes and standards.

Environmental Operating Conditions

The Fire-Lite ANN-80 is engineered for robust performance across a wide range of environmental conditions. It’s designed to operate reliably in temperatures ranging from 32°F to 122°F (0°C to 50°C), making it suitable for most indoor environments. Relative humidity can be between 10% and 95%, non-condensing, ensuring functionality even in humid locations.

The unit is built to withstand vibration and shock commonly found in commercial and industrial settings. It should not be exposed to direct sunlight or extreme temperature fluctuations. While the ANN-80 isn’t waterproof, it can tolerate occasional splashes, but prolonged exposure to moisture should be avoided. Installation locations should be free from corrosive gases or excessive dust to maintain optimal performance and longevity.

Compatibility and Integration

The Fire-Lite ANN-80 seamlessly integrates with compatible FACP panels, including the Fire-Lite MRP2002E, displaying system point status in clear English text.

Compatible Fire Alarm Control Panels (FACP)

The Fire-Lite ANN-80 remote annunciator is designed for broad compatibility within the Fire-Lite ecosystem, ensuring seamless integration with various Fire Alarm Control Panels (FACP). Specifically, it’s confirmed to work effectively with the Fire-Lite MRP2002E, mirroring the FACP’s display and providing localized system status information.

Beyond the MRP2002E, the ANN-80 is generally compatible with most Fire-Lite addressable FACP models that support remote annunciator functionality. However, it’s crucial to verify compatibility with your specific FACP model by consulting the Fire-Lite documentation or contacting Fire-Lite technical support. Proper compatibility guarantees accurate system point status display and reliable communication between the ANN-80 and the central control panel, enhancing overall fire safety system performance.

Integration with Fire-Lite MRP2002E

Integrating the Fire-Lite ANN-80 with the MRP2002E FACP is a straightforward process, designed for efficient system monitoring. The ANN-80 directly mimics the MRP2002E’s display, providing a remote, localized view of system status, including zone identification and alarm conditions. This mirroring functionality allows personnel to quickly assess the situation without needing to access the main control panel.

Connection utilizes standard wiring methods as outlined in both the ANN-80 and MRP2002E manuals. Proper addressing of the ANN-80 on the system loop is critical for successful communication. The MRP2002E’s programming interface allows for easy configuration of the ANN-80, ensuring accurate data transmission and display. This integration enhances overall system responsiveness and situational awareness.

Network Considerations and Addressing

When integrating the ANN-80 into a Fire-Lite system, careful network planning and addressing are crucial for reliable communication. Each ANN-80 unit requires a unique address on the system loop, configured through the compatible FACP (Fire Alarm Control Panel). Avoid address conflicts to prevent communication errors and ensure proper system functionality.

Consider the total loop length and the number of devices connected when determining addressing schemes. Longer loops may require signal amplification to maintain reliable data transmission. Proper termination of the loop is also essential. Refer to the FACP’s documentation for specific guidelines on loop wiring and addressing protocols. Accurate addressing ensures the ANN-80 receives and displays the correct system information;

Advanced Features

The ANN-80 boasts customizable display settings, remote reset capabilities, and detailed event logging for comprehensive fire system monitoring and historical data analysis.

Customizable Display Settings

The Fire-Lite ANN-80 offers a range of customizable display settings to tailor the annunciator to specific user needs and preferences. Users can adjust the LCD backlight intensity for optimal visibility in varying lighting conditions, ensuring clear readability during emergencies. Furthermore, the display can be configured to show specific system points or zones, prioritizing critical information.

Contrast levels are also adjustable, enhancing clarity and reducing eye strain. The annunciator supports English-language text for system point status, providing easily understandable alerts. Advanced users can configure the display to cycle through different information screens, presenting a comprehensive overview of the fire alarm system’s status. These settings are easily accessible through a user-friendly interface, allowing for quick and efficient customization.

Remote Reset Capabilities

The Fire-Lite ANN-80 boasts robust remote reset capabilities, enhancing system efficiency and minimizing response times during fire alarm events. Authorized personnel can remotely acknowledge and reset alarms directly from the annunciator, eliminating the need to physically access the Fire Alarm Control Panel (FACP) in certain situations. This feature streamlines the restoration process, reducing downtime and improving overall system management.

Remote reset functionality is secured through access control measures, preventing unauthorized resets and maintaining system integrity. The annunciator clearly indicates when a remote reset has been performed, providing a detailed audit trail. This capability is particularly valuable in large facilities or campuses, where the FACP may be located remotely from the point of alarm.

Event Logging and History

The Fire-Lite ANN-80 incorporates a comprehensive event logging system, meticulously recording all significant system activities for detailed analysis and reporting. This historical data includes alarm activations, trouble conditions, system resets, and communication events with the connected FACP. The log provides a chronological record, facilitating accurate troubleshooting and identifying potential system issues;

Stored event data assists in post-incident investigations, offering valuable insights into the sequence of events leading up to an alarm. The ANN-80’s event history aids in preventative maintenance, allowing technicians to identify recurring problems and address them proactively. Access to the event log is typically password-protected, ensuring data security and preventing unauthorized modification.

llama instruct vs chat

Llama Instruct vs. Chat: A Comprehensive Comparison (as of 03/05/2026)

Llama Instruct excels at single tasks, providing direct responses, while Llama Chat is optimized for multi-turn conversations maintaining context effectively.

Llama, developed by Meta, represents a significant leap in open-source AI chatbots, designed for complex reasoning, efficient coding, and handling knowledge-intensive tasks. The evolution from Llama 1 and Llama 2 culminated in Llama 3, offering an enhanced and more intelligent AI experience. These models aren’t monolithic; they’re tailored through specific tuning processes.

Crucially, Llama exists in distinct forms: Llama Instruct and Llama Chat. Understanding their individual strengths is vital. These aren’t simply different versions, but fundamentally different approaches to interacting with and utilizing large language model capabilities. The choice between them depends heavily on the intended application and desired user experience.

The Rise of Open-Source LLMs

The landscape of Large Language Models (LLMs) is undergoing a dramatic shift, moving beyond proprietary systems towards a thriving open-source ecosystem. This democratization empowers researchers, developers, and businesses with greater control, customization, and transparency. Llama models, spearheaded by Meta, are at the forefront of this revolution, challenging the dominance of closed-source alternatives like OpenAI’s GPT models.

This open approach fosters innovation and allows for community-driven improvements. However, it also introduces challenges, notably concerning responsible AI development and potential misuse, as evidenced by reports of unauthorized military applications utilizing Llama by the Chinese PLA Academy. The availability of models like Llama Instruct and Llama Chat accelerates this dynamic.

Llama 3: A Significant Advancement

Llama 3 represents a substantial leap forward in Meta’s LLM development, building upon the foundations laid by Llama 1 and Llama 2. Released in April 2024, the initial models – Llama 3 8B and Llama 3 70B – established new benchmarks for open-source LLMs, delivering an enhanced and more intelligent AI experience. The latest iteration, Llama 3.1 405B, further solidifies this position, rivaling even the most advanced closed-source models in flexibility and control.

This advancement impacts both Llama Instruct and Llama Chat, providing a more powerful base for task-specific instruction following and engaging conversational abilities. Capabilities like synthetic data generation and model distillation are now more accessible.

Understanding Llama Instruct

Llama Instruct models are specifically fine-tuned for single tasks or questions, delivering optimal performance when a concise, direct response is required.

What is an Instruct-Tuned Model?

An instruct-tuned model, like Llama Instruct, represents a significant refinement within the landscape of large language models (LLMs). Unlike base models trained on broad datasets, instruct-tuned models undergo further training specifically focused on following human instructions. This process, often utilizing supervised fine-tuning, involves exposing the model to a dataset of prompts and desired responses.

The core objective is to align the model’s output with human expectations for helpfulness, relevance, and accuracy. Essentially, it learns to interpret and execute commands effectively. This contrasts with chat-tuned models, which prioritize conversational flow and maintaining context across multiple turns. Instruct models are designed for a single, focused interaction, excelling at completing a specific task based on a given prompt – a direct question or request.

Key Characteristics of Llama Instruct

Llama Instruct distinguishes itself through its specialization in direct response generation. It’s meticulously fine-tuned to excel at single-turn interactions, meaning it’s optimized to provide a concise and relevant answer to a specific prompt without needing prior conversational history. This focus results in a model adept at completing individual tasks efficiently.

Its strength lies in its ability to understand and execute instructions accurately, making it ideal for applications requiring precise outputs. Unlike its chat-tuned counterpart, Llama Instruct doesn’t prioritize maintaining a continuous dialogue; instead, it delivers a focused solution. This characteristic makes it particularly suitable for applications like question answering, summarization, and code generation where a single, well-defined response is paramount.

Use Cases for Llama Instruct

Given its proficiency in single-turn tasks, Llama Instruct finds application in diverse scenarios demanding precise outputs. It’s exceptionally well-suited for question answering systems, where accurate and direct responses are crucial. Furthermore, its capabilities extend to text summarization, efficiently condensing lengthy content into concise summaries.

Code generation represents another strong use case, leveraging its instruction-following abilities to produce functional code snippets. Beyond these, Llama Instruct proves valuable in data extraction, quickly identifying and retrieving specific information from large datasets. Its focused nature makes it a powerful tool for tasks requiring minimal conversational overhead, prioritizing efficiency and accuracy in delivering targeted results.

Llama Instruct Performance Benchmarks

As of March 5th, 2026, Llama Instruct demonstrates strong performance on benchmarks evaluating single-turn task completion. While specific scores vary depending on the benchmark dataset, it consistently outperforms earlier Llama iterations and rivals some closed-source models in focused tasks. Evaluations highlight its accuracy in question answering and its efficiency in generating concise summaries.

However, benchmarks also reveal limitations in multi-turn conversational abilities compared to Llama Chat. Metrics assessing coherence and context retention over extended dialogues show a noticeable difference. Despite this, Llama Instruct remains a competitive choice when prioritizing direct response quality and task-specific precision over sustained conversational flow.

Exploring Llama Chat

Llama Chat is specifically finetuned for engaging in back-and-forth conversations, adeptly handling multiple questions and maintaining context throughout the interaction.

What is a Chat-Tuned Model?

A chat-tuned model, like Llama Chat, represents a significant evolution in large language model (LLM) capabilities. Unlike models designed for single-turn responses, chat-tuned models are meticulously refined through extensive training on conversational datasets. This process involves exposing the model to numerous dialogues, enabling it to learn the nuances of human interaction – including turn-taking, context retention, and appropriate response generation.

The core distinction lies in the training methodology. While instruct-tuned models focus on excelling at individual tasks, chat-tuned models prioritize maintaining a coherent and engaging conversational flow. They are designed to understand and respond to follow-up questions, remember previous statements within the conversation, and adapt their responses accordingly. This makes them ideal for applications requiring dynamic and interactive experiences, such as chatbots and virtual assistants.

Key Characteristics of Llama Chat

Llama Chat distinguishes itself through its proficiency in multi-turn conversations, a direct result of its specialized training. It excels at maintaining context throughout extended dialogues, remembering prior interactions to deliver relevant and coherent responses. This characteristic is crucial for building engaging and natural-feeling conversational AI experiences.

Furthermore, Llama Chat demonstrates a strong ability to handle varied conversational topics and adapt its response style to suit the ongoing discussion. It’s designed not just to answer questions, but to participate in a dynamic exchange, fostering a more interactive and human-like interaction. This makes it particularly well-suited for applications demanding nuanced and context-aware communication.

Use Cases for Llama Chat

Given its conversational prowess, Llama Chat is ideally suited for applications requiring sustained dialogue. This includes sophisticated chatbot development for customer service, offering personalized support and resolving complex issues through multi-turn interactions. Virtual assistants benefit greatly, providing a more natural and engaging user experience beyond simple command execution.

Furthermore, Llama Chat excels in creating interactive storytelling experiences, role-playing games, and educational tools where dynamic conversation is paramount. Its ability to maintain context allows for intricate narratives and personalized learning paths. The model’s adaptability also makes it valuable for social companion applications, fostering engaging and empathetic interactions with users.

Llama Chat Performance Benchmarks

As of March 5th, 2026, Llama Chat demonstrates strong performance in conversational benchmarks, consistently achieving high scores in metrics evaluating coherence, engagement, and context retention throughout extended dialogues. While direct comparisons to Llama Instruct are nuanced, Llama Chat typically outperforms it in tasks requiring multi-turn reasoning and nuanced understanding of conversational flow.

Evaluations reveal Llama Chat’s ability to handle complex prompts and maintain consistent persona throughout interactions. However, it may exhibit slightly lower accuracy on isolated, single-turn question-answering tasks compared to the more task-focused Llama Instruct. Recent Llama 3 iterations showcase significant improvements, rivaling closed-source models in overall conversational quality and responsiveness.

Llama Instruct vs. Chat: Core Differences

Instruct models are finetuned for single tasks, excelling at direct responses, whereas Chat models are optimized for multi-turn, contextual conversations.

Single-Turn vs. Multi-Turn Conversations

A fundamental distinction between Llama Instruct and Llama Chat lies in their conversational capabilities. Llama Instruct is primarily designed for single-turn interactions – you pose a question or provide a prompt, and it delivers a concise, focused response. It doesn’t inherently retain memory of previous exchanges. Conversely, Llama Chat is specifically engineered for multi-turn conversations.

This means it’s built to remember and utilize the context established throughout an ongoing dialogue. It can follow up on previous statements, refer back to earlier topics, and maintain a coherent conversational flow. The chat-tuned model excels at back-and-forth exchanges, adapting its responses based on the evolving context of the conversation, unlike the instruct model’s isolated response style.

Task Specialization vs. Conversational Flow

Llama Instruct demonstrates strong task specialization, being finely tuned to excel at performing specific instructions or answering direct questions. Its strength resides in delivering accurate and relevant responses to isolated prompts. However, it lacks the nuanced understanding required for extended, dynamic interactions. Llama Chat, on the other hand, prioritizes conversational flow.

It’s designed to engage in more natural and open-ended dialogues, adapting to the user’s input and maintaining a consistent persona. While capable of completing tasks, its primary focus is on creating a seamless and engaging conversational experience, rather than simply fulfilling individual requests with pinpoint accuracy. This difference stems from their respective training methodologies.

Response Style and Format

Llama Instruct typically delivers concise, direct responses focused on fulfilling the given instruction. The output format is often straightforward, prioritizing clarity and accuracy over stylistic flair. It aims to provide a precise answer without unnecessary elaboration, making it ideal for applications requiring factual information or task completion.

Conversely, Llama Chat exhibits a more conversational and nuanced response style. It’s designed to generate human-like text, incorporating elements like greetings, acknowledgements, and follow-up questions. The format is often more elaborate, resembling a natural dialogue, and prioritizes engagement and user experience. This difference reflects their intended use cases – task-oriented versus interactive conversation.

Hardware Requirements for Running Llama Models

Llama 3, and its variants like Instruct and Chat, demand significant storage, RAM, GPU acceleration, and CPU power for optimal local execution.

The Role of Storage

Storage serves as the permanent home for Llama models, whether Instruct or Chat, before they’re loaded into RAM for processing. Downloading these models—ranging in size from 8B to 405B parameters—requires substantial disk space. Faster storage solutions, like Solid State Drives (SSDs), are crucial; they significantly reduce model loading times compared to traditional Hard Disk Drives (HDDs).

The sheer size of Llama 3.1 405B necessitates ample storage capacity. Insufficient storage not only prevents model loading but also impacts performance during swap operations if the system resorts to using virtual memory. Prioritizing high-capacity, high-speed storage is therefore paramount for a smooth AI experience with these powerful language models.

The Importance of RAM

RAM is critical for running Llama models, both Instruct and Chat, as it holds the active model weights during computation. Insufficient RAM forces the system to swap data to storage, drastically slowing down performance. Larger models, like Llama 3.1 405B, demand substantial RAM – potentially hundreds of gigabytes – for efficient operation.

The amount of RAM directly impacts the speed of inference and the ability to handle complex prompts. While Instruct models might be less RAM-intensive for single queries, Chat models, maintaining conversational context, require more. Optimizing RAM usage is essential for a responsive and fluid AI interaction, preventing frustrating delays.

GPU Acceleration

GPU acceleration is paramount for practical Llama model performance, whether running Instruct or Chat variants. These models involve massive parallel computations, perfectly suited to GPUs’ architecture. Utilizing a powerful GPU significantly reduces inference times, making interactions feel instantaneous.

The larger the model – such as Llama 3.1 405B – the greater the benefit from GPU acceleration. While a CPU can run these models, it’s impractically slow. Chat models, due to their ongoing contextual processing, particularly benefit from a robust GPU. Investing in a capable GPU is crucial for unlocking the full potential of these advanced LLMs and ensuring a smooth user experience.

CPU Considerations

While a GPU handles the bulk of processing for Llama models – both Instruct and Chat – the CPU remains vital. It manages data transfer between storage, RAM, and the GPU, and handles pre- and post-processing tasks. A faster CPU prevents bottlenecks, ensuring the GPU isn’t starved for data.

For smaller Llama models, a decent multi-core CPU might suffice, but larger models like Llama 3.1 405B demand a high-end processor. The CPU’s role is more critical for Instruct models with simpler tasks, but a strong CPU still enhances overall system responsiveness, especially during initial model loading and complex prompt handling.

Security and Ethical Considerations

Llama models, including Instruct and Chat, raise concerns about misuse, like the unauthorized military application reported with the China PLA Academy.

Military Applications and Licensing (China PLA Academy)

Recent reports highlighted a significant ethical and security concern regarding Llama models. In 2024, researchers at the Peoples Liberation Army Academy of Military Sciences in China reportedly developed a military tool utilizing Llama, a direct violation of Meta’s licensing terms.

Meta Platforms explicitly prohibits the use of its Llama models for military purposes. This unauthorized application underscores the challenges in controlling open-source AI technology and preventing its misuse. The incident prompted Meta to address the situation, emphasizing the importance of responsible AI development and adherence to licensing agreements.

Both Llama Instruct and Llama Chat, being part of the Llama family, are subject to these licensing restrictions, highlighting the need for robust safeguards against unintended applications.

Responsible AI Development

The emergence of powerful open-source LLMs like Llama Instruct and Llama Chat necessitates a strong focus on responsible AI development. Addressing potential misuse, as demonstrated by the unauthorized military application by the China PLA Academy, is paramount.

Developers and users must prioritize ethical considerations, ensuring alignment with licensing terms and promoting beneficial applications. This includes actively mitigating potential biases embedded within the models, striving for fairness and inclusivity in outputs.

Transparency in model training and deployment is crucial, alongside ongoing monitoring for unintended consequences. A collaborative approach, involving researchers, policymakers, and the community, is essential to navigate the complex landscape of AI ethics and ensure these tools serve humanity responsibly.

Potential Biases in Llama Models

Like all large language models, Llama Instruct and Llama Chat are susceptible to inherent biases present in their training data. These biases can manifest as skewed outputs, reinforcing societal stereotypes or exhibiting unfair preferences.

The nature of these biases differs depending on the model’s tuning; Instruct models, focused on direct responses, might amplify biases in factual recall, while Chat models could perpetuate them through conversational patterns.

Mitigation requires careful data curation, bias detection techniques, and ongoing evaluation of model outputs. Developers must actively work to identify and address these issues, promoting fairness and inclusivity in AI-generated content, acknowledging that complete elimination is a complex challenge.

Llama 3.1 405B: State-of-the-Art Capabilities

Llama 3.1 405B’s flexibility enables advanced workflows like synthetic data generation and model distillation, benefiting both Instruct and Chat applications.

Unmatched Flexibility and Control

Llama 3.1 405B delivers unprecedented control, empowering developers to tailor models precisely to their needs. This is particularly impactful when contrasting Llama Instruct and Llama Chat. The model’s architecture allows for fine-tuning that optimizes Instruct for concise, task-focused outputs, ideal for single-turn queries. Conversely, it enables Chat to maintain coherent, multi-turn dialogues, remembering context across extended interactions.

This level of control extends to data manipulation, allowing for the creation of specialized datasets. Developers can generate synthetic data to enhance either model’s performance in specific domains, further differentiating the strengths of Instruct versus Chat. Ultimately, Llama 3.1 405B provides the tools to unlock the full potential of both conversational and instruction-following AI.

Synthetic Data Generation

Llama 3.1 405B’s capabilities extend to generating synthetic data, a crucial advantage when refining Llama Instruct and Llama Chat. For Instruct, synthetic datasets can focus on diverse, single-turn prompts, enhancing its ability to accurately address varied requests. Conversely, for Chat, synthetic data can simulate complex, multi-turn conversations, improving contextual understanding and response coherence.

This process allows developers to overcome data scarcity issues and tailor models to niche applications. By creating targeted synthetic datasets, the strengths of each model – Instruct’s precision and Chat’s conversational flow – are amplified. This controlled data augmentation unlocks new workflows and significantly boosts performance, especially in specialized domains.

Model Distillation

Llama 3.1 405B facilitates model distillation, a technique to transfer knowledge from a larger model to smaller, more efficient versions of both Llama Instruct and Llama Chat. This is vital for deploying these models on resource-constrained devices. Distilling Instruct creates compact models retaining its single-turn task proficiency, ideal for quick, focused applications.

For Chat, distillation preserves conversational abilities within a smaller footprint, enabling responsive interactions even with limited hardware. This process doesn’t just reduce size; it maintains performance, allowing wider accessibility. The resulting distilled models offer a balance between capability and efficiency, broadening the potential applications of the Llama ecosystem.